Chapter 2 - GETTING STARTED
2.1 Upgrade notice
If you are upgrading from earlier versions of the LTP program, you will have write new *.pro protocol files. The newer LTP113E program will not load protocol files you made using a previous LTP program for safety reasons (see APPENDIX E).
Note that you can analyze the same ADsweep files with LTP113E that were obtained with all earlier versions of the LTP program.
2.2 Installing the Program
2.1.1 Go to the Explorer (in Windows 95/98) or File Manager (in Windows 3.x) and create the directory \LTP113E on the appropriate drive (I will assume the C: drive for this discussion). Then download the self-extracting zip file LTP113EZ.EXE from the 'LTP' Internet Web Page:
https://www.bris.ac.uk/Depts/Anatomy/research/neuro/LTPsoftware/
Then double click on the LTP113EZ.EXE file to extract the following files which should now be in your \LTP113E directory:
| LTP113E.EXE | (the main LTP program) | |||||
| DOS4GW.EXE | (the 32-bit DOS extender) | |||||
| LTPVGA.FON | (a font file required by the LTP program) | |||||
| MAN113.DOC | (Obviously, to get this far you will have to have read this information downloaded.) |
2.2.2. If you are using Windows 95 or Windows 98:
Modify the autoexec.bat file in the C:\ root directory by using NOTEPAD.EXE or other text editor by adding C:\LTP113E; to your PATH line like this:
PATH=C:\LTP113E;
To implement the changes made to the autoexec.bat file you must first reboot the computer by clicking on 'Start', then 'Shut Down', and then 'Restart the computer'.
(Note: specific Windows 95/98 support in the LTP program will be implemented in the future so that you will only have to click on an LTP program icon in Windows 95/98 to go to MS-DOS Mode and run the LTP program - but this is not available yet.)
2.2.3. If you are using MS-DOS 6.0/6.2 (with Windows 3.0/3.1/3.11):
Modify the autoexec.bat file in the C:\ root directory by using EDIT.COM, NOTEPAD.EXE or other text editor by adding C:\LTP; to your PATH line like this:
PATH=C:\DOS;C:\WINDOWS;C:\LTP113E;
If faster saving of data is required (forinstance for saving AD waveforms during fast 2Hz LTD stimulation) you may try removing the /X flag following SMARTDRV in the config.sys or autoexec.bat files located in the C:\ root directory. (This does not speed up saving on all computers. For example, this sped up saving AD sweep files faster on a Dell 486/66MHz, but not on a Dell Pentium/60 MHz.) In the config.sys file:
DEVICE = C:\WINDOWS\SMARTDRV /X
becomes
DEVICE = C:\WINDOWS\SMARTDRV
Or, in the autoexec.bat file:
C:\WINDOWS\SMARTDRV.EXE /X
becomes
C:\WINDOWS\SMARTDRV.EXE
To implement the changes made to the config.sys and autoexec.bat files you must first reboot the computer by pressing CTL-ALT-DEL, pressing the reboot button, or by turning OFF then turning ON the power again.
2.2.4. Memory Requirements.
LTP113E needs at least 4.4 MB of extended (XMS) memory, meaning that machines with at least 8 MB of memory is the practical minimum required. If you only have a computer with 4 MB of memory (and can't install more), an earlier 'real mode' DOS LTP program (LTP091I3.EXE) is available from me that works in the lower 640KB of memory.
2.2.5. Check For Correct Memory Manager, HIMEM.SYS
If you are using DOS 6.x / Windows 3.x, you should have HIMEM.SYS is in your AUTOEXEC.BAT and not another memory manager like QEMM.SYS or 386MAX.SYS. The normal installation of DOS 6.x / Windows 3.x automatically installs HIMEM.SYS. Similarly, if you are using Windows 95/98 HIMEM.SYS does not have to be in your AUTOEXEC.BAT - it automatically used. However, you should make sure that another memory manager like QEMM.SYS or 386MAX.SYS is not in your AUTOEXEC.BAT. (It is possible that other memory managers such has QEMM.SYS, 386MAX.SYS may work fine, but I have not tried them and therefore will not recommend them. Only use them if you are 100% sure they are working correctly.)
The reason for being careful about what memory manager to use is the following. The LTP113E program uses a DPMI (DOS Protected Mode Interface) host which helps the LTP program talk to the computer hardware. If the HIMEM.SYS memory manager is used with the LTP program, then the DPMI host is the Watcom C / Tenberry's DOS/4GW DPMI host. This is a well defined DPMI host which works well in real-time, and has been well tested by me.
DPMI hosts can be either 'real' or 'virtual'. When the DPMI host is 'real', the DOS program has complete control of the machine. When HIMEM.SYS and Watcom C / Tenberry's DOS/4GW are used, the DPMI host is 'real', and when the LTP113E program blocks keyboard, disk drive, or network card interrupts during data acquisition and stimulation, they are really blocked and there are no delays!!!!
Some DPMI hosts can be 'virtual' DPMI hosts meaning that the DOS program does not have complete control of the machine. With a 'virtual' DPMI host, the keyboard and disk drive interrupts appear blocked to the DOS LTP113E program but they are not actually blocked in the computer - and therefore substantial delays of 1 msec or longer can occur during acquisition/stimulation and your synaptic potential would appear much shorter.
Therefore, be sure you are using HIMEM.SYS, and test for any delays during the data acquisition / stimulation sweep by using a triangular waveform input (as described in Section 2.8.1). Also test the sample-to-sample jitter by measuring the width of a train S0 pulse (see Section 2.8.2).
Note that the Watcom C / Tenberry 32-bit DOS extender combination has been used to develop a large number of the common DOS games such as DOOM and DESCENT which are incredible from a programming point of view. (Just look for the "DOS/4GW Protected Mode Run-time Version 1.97, Copyright (c) Rational Systems, Inc. 1990-1994" sign-on when the program starts up.) This is a commonly used and stable environment.
2.3 Installing the Data Acquisition Board
The LTP113E program presently runs on three data acquisition boards: the Axon Instruments Digidata 1200/1200A board, the Scientific Solutions Labmaster board, and the Pico Technology 42-ADC board.
2.3.1 Axon Instruments Digidata 1200/1200A Board
The Digidata board is one of the most popular data acquisition boards for neurophysiology, almost solely due to its use by the Axon Instruments program pClamp. The Digidata board also comes with its own interface, and the electrode <-> interface connections are based on using this interface. LTP113E uses the analog input channel AnalogIn0, the analog output channels AnalogOut0, AnalogOut1, and the digital output channels DigitalOut0, DigitalOut1, DigitalOut2, and DigitalOut3.
The factory settings for the Digidata board base address (320 hexadecimal) will normally be used. If so, the LTP program will be started by the command line:
C:\YOURDATA\980704\> ltp113e
However, if you need to use the Digidata board at a non-default base address, enter the following command line (for example at a base address of 100 hexadecimal):
C:\YOURDATA\980704\> ltp113e 100
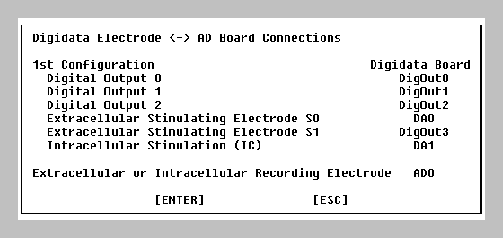
For an LTP experiment with one recording electrode (extracellular or intracellular), intracellular (IC) stimulation through the recording electrode (if applicable) and two extracellular stimulating electrodes (S0 and S1), connect the recording electrode amplifier and Stimulation Isolation Units (SIUs) as shown in the Digidata Electrode Connections Help Box (Fig. 2.3.1). This information can be viewed in the LTP program by using the menu command:
Help -> Electrode<->AD board Connections
Fig. 2.3.1. Digidata Electrode Connections Help Box.
Presently, the Digidata board is programmed using the slower Software controlled acquisition and stimulation, and therefore does not run on some of the slowest computers (e.g. a Tandon 16 MHz 386) but does work on faster computers (e.g. a Tandon 25 MHz 486 and above). With Software controlled acquisition there is also some Analog input and Analog/Digital output sample-to-sample jitter on the order of 2-7 usec. For timing errors in sample-to-sample jitter and sweep-to-sweep jitter with the Digidata board, see APPENDIX A.6.
2.3.2 Scientific Solutions Labmaster Board
The Scientific Solutions Labmaster data acquisition board in the past been one of the most commonly used AD boards in neurophysiology, again due in part to its use by the Axon Instruments program pClamp. The Scientific Solutions Labmaster board was also previously marketed by Axon Instruments, and Axon Instruments also previously sold their own interface unit for the Labmaster board, the Axon Instruments TL-1 interface. The electrode <-> interface connections for the LTP program are based on this TL-1 interface. The input channel (AD15), and the output channels (DA0, DA1, Ports C4, C5, and C6) are commonly used by the Axon Instruments program pClamp 6, and the LTP113E program will automatically work on a computer set up to use pClamp 6.
Because the LTP113E program cannot automatically detect if a Labmaster board is installed (as it can do for a Digidata board), an additional word 'labmaster' must be added to the command line when LTP113E is started in order to use the Labmaster board. The factory settings for the Labmaster board base address (710 hexadecimal) will normally be used. If so, the LTP program will be started by the command line:
C:\YOURDATA\980704\> ltp113e labmaster
However, if you need to use the Labmaster board at a non-default base address, enter the following command line (for example at a base address of 100 hexadecimal):
C:\YOURDATA\980704\> ltp113e labmaster 100
For an LTP experiment with one recording electrode (extracellular or intracellular), intracellular (IC) stimulation through the recording electrode (if applicable) and two extracellular stimulating electrodes (S0 and S1), connect the recording electrode amplifier and SIUs to the Axon TL-1 interface as shown in the Labmaster Electrode Connections Help Box (Fig. 2.3.2). This information can be viewed in the LTP program by using the menu command:
Help -> Electrode<->AD board Connections
Fig. 2.3.2. Labmaster Electrode Connections Help Box.
For timing errors in Analog input and Analog/Digital output sample-to-sample jitter (on the order of 2-4 usec) and sweep-to-sweep jitter with the Labmaster board, see APPENDIX A.6.
2.3.3 Pico Technology's ADC-42 Board
I wanted to have the LTP program also work with a low cost data acquisition board. At present, the cost an AD board can be twice the cost of a completely adequate Pentium computer. The Pico ADC-42 board is a very low cost (ca. �85 / $155) 12-bit AD 'board'. It plugs into a parallel printer port and acquires data on one AD channel. Digital output can either come from the same printer port or a second printer port (which can be separately purchased for ca. �10). Sometimes the second printer port is necessary because they often have greater digital current output which may be necessary for triggering some SIUs. The Pico board is perfectly adequate for extracellular experiments.
Because the LTP113E program cannot automatically detect if a Pico board is attached (as it can for the Digidata board), an additional word must be added to the command line when LTP113E is started in order to use the Pico board. If the Pico ADC-42 board is attached to the LPT1 printer port and digital output is also through LPT1 use the following command:
C:\YOURDATA\980704\> ltp113e pico42_dio_1
Alternatively, if using the LPT2 or LPT3 port instead of the LPT1 port use one of the following commands:
| C:\YOURDATA\980704\> ltp113e pico42_dio_2 | |||
| C:\YOURDATA\980704\> ltp113e pico42_dio_3 |
If the Pico ADC-42 board is attached to the LPT1 port and digital output is through the LPT2 port, use the following command:
C:\YOURDATA\980704\> ltp113e pico42_1__dio_2
Alternatively, if the Pico ADC-42 board is attached to the LPT2 port and digital output is through the LPT3 port, use the following command:
C:\YOURDATA\980704\> ltp113e pico42_2__dio_3
Also note that for reanalysis of ADsweep files taken with the Pico board, you should start the program in reanalysis mode with this on the command line (just as you did when you were running the experiment, and even if running the reanalysis in the Windows DOS compatibility box). Essentially, 1 bit of accuracy will be lost, otherwise the reanalysis results are exactly the same (APPENDIX A.3).
| C:\LTP113E\980704\> ltp113e pico42_dio_1 | (GOOD for Pico data reanalysis) | ||
| or | |||
| C:\LTP113E\980704\> ltp113e pico42_1__dio_2 | (GOOD for Pico data reanalysis) | ||
| but not | |||
| C:\LTP113E\980704\> ltp113e | (BAD for Pico data reanalysis!!!!!) |
If you are using the Pico board, it is good to put these commands into a batch file (say LTP.BAT) in the C:\LTP113E directory, and always call the LTP113E program from the batch file.
For an LTP experiment with one recording electrode (extracellular or intracellular), intracellular (IC) stimulation through the recording electrode (if applicable) and two extracellular stimulating electrodes (S0 and S1), connect the recording electrode amplifier and SIUs to Pico42 board on LPT1 and digital output through LTP1 as shown in the Pico ADC-42 / One Port Electrode Connections Help Box (Fig. 2.3.3). This information can be viewed in the LTP program by using the menu command:
Help -> Electrode<->AD board Connections
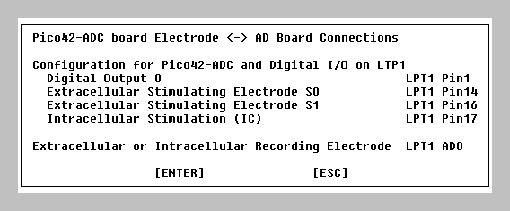
Fig. 2.3.3. Pico42 Electrode Connections Help Box (using one printer port).
Use Pin 18 (chassis Ground) if you want to ground coaxial shielding. The wire connections are shown schematically in Fig. 2.3.4, and a picture of the Pico-42 ADC board and digital output using the LPT1 parallel port on a laptop computer is shown in Fig. 2.3.5.
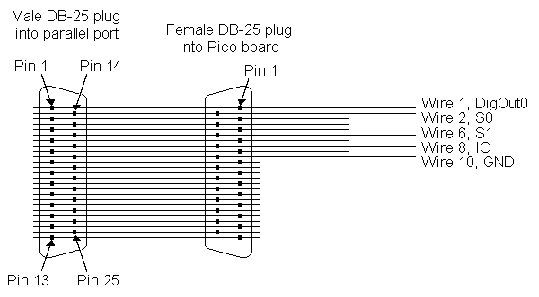
Fig. 2.3.4. Ribbon cable connections for Pico board and Digital Output for connection to one parallel port.
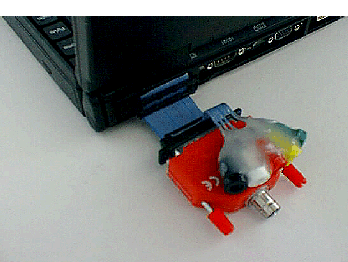
Fig. 2.3.5. Photo of the Pico ADC-42 connected to the parallel port of a laptop computer by a ribbon cable and two DB-25 plugs. The parallel port also produces four digital outputs (Right to Left - Green/Right plug, Wire 1, DigitalOut0; Yellow plug, Wire 2, S0; Red plug, Wire 6, S1; White plug, Wire 8, IC) and a ground to the parallel port (Black/Left plug, Wire 10, GND).
For an LTP experiment with the Pico ADC-42 board connected to LPT1 and digital output through LPT2, connect the electrodes as shown in the Pico42 / Two Port Electrode Connections Help Box (Fig. 2.3.6).
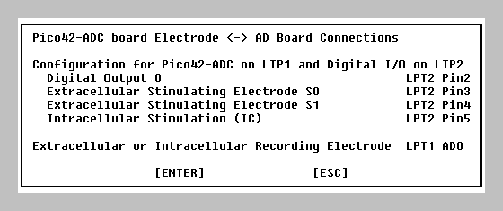
Fig. 2.3.6. Pico ADC-42 Electrode Connections Help Box (using two printer ports).
Use Pin 18 (chassis Ground) if you want to ground coaxial shielding. The wire connections are shown schematically in Fig. 2.3.7 for the connections of the digital output from the second of two parallel ports.
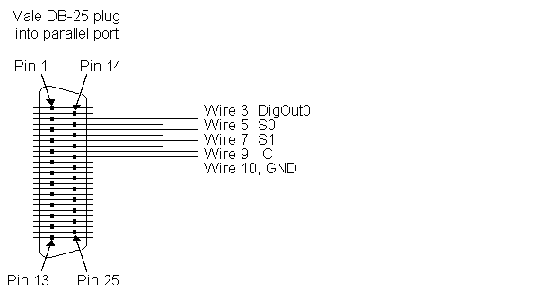
Fig. 2.3.7. Ribbon cable connections for the Digital Output from the second of two parallel ports.
There are two potential problems with the Pico ADC-42 board. First, is your computer fast enough? When the LTP program is started it will automatically determine if the computer is too slow for the Pico board, (for example by running ltp113e pico42_dio_1 as described above). If the computer is too slow, the program will terminate (see APPENDIX A.13). You can even test this without the Pico board being installed. This is because the speed of the acquisition is determined by how fast the data can be read from the parallel port (one bit at a time!), and the Pico board does not actually have to be installed to do this. Pico board AD conversion is always complete within 100 usec.
The second potential problem with using the Pico ADC-42 board is: Are the parallel port digital outputs capable of triggering a SIU? We've found that LPT1 has difficulty triggering our Neurolog SIUs, but LPT2 output will trigger them. Again you can test this digital output capability without having to have the Pico board installed.
If you want to use the Pico board with the LPT1 parallel port and it does not have enough current output to trigger your SIUs, you could interface to a TTL chip for amplification. Alternatively, you could use four 4.7 Kohm pull-up resistors connected to a 5 volt source - read the Web document "Interfacing the Parallel Port" at www.senet.com.au/~cpeacock/parallel.htm#2 - although like they say, you do so at your own risk.
Finally, according to the Pico Technology, the accuracy of the Pico ADC-42 board is about +1%. Because of this we presently use the Pico ADC-42 board only for extracellular LTP experiments, although, if you calibrated your system and you were sure the board was within your accuracy requirements, you could use the board for intracellular recording and patch clamping.
Also note that the input voltage range on the Pico board is -5 to +5 volts (in contrast to the -10 to 10 volts on the Labmaster and Digidata board). For timing errors in Analog input and Digital output sample-to-sample jitter (on the order of 2-5 usec) and sweep-to-sweep jitter with the Pico board and printer port, see APPENDIX A.6.
Finally, note that the fastest the Pico board can do repeat ADsweep (LTD) stimulation is 1.0 Hz (see APPENDIX A.7).
The Pico ADC-42 board was my first try using a very low cost AD board with the LTP program (actually it's cousin, the Pico ADC-12 board was my very first try - see APPENDIX C).
I am presently examining another low cost AD board that will work on the PCI bus, have 8 AD channels, input gains of x1, x10, x100 or x1000 (an additional signal amplifier may not be necessary) and is much faster than the Pico ADC-42 board (20-50 usec sample intervals). Although the Pico ADC-42 board may be supplanted by other low cost AD boards in desktop machines, currently it is the only very low cost AD board that works with LTP113E and works on PC99 specification computers which do not have the ISA bus (APPENDIX D.4), and the Pico ADC-42 board may continue to be useful in laptop computers.
Pico Technology can be located on the Internet:
2.4 Starting the LTP Program
Although there are several ways of doing an on-line experiment and organizing you data files, the following one is the standard method we use with LTP113E. (This method will be improved shortly, but for now use this tried and tested method which has been used for over 3 years.)
2.4.1 Enter the MS-DOS Mode (Windows 95/98) or 'Real' Command Line DOS (MS-DOS 6.x / Windows 3.x).
If your computer has Windows 95/98, the LTP program will run on-line in only the MS-DOS Mode, (but it will do off-line reanalysis in either the MS-DOS Mode or in the Windows 95/98 DOS Compatibility Box). Similarly, if your computer has both MS-DOS 6.0/6.2 and Windows 3.0/3.1/3.11, the LTP program will run on-line in only the 'Real' Command Line DOS mode before starting Windows (but it will do off-line reanalysis in either the 'Real' Command Line DOS mode or in the Windows 3.x DOS Compatibility Box). The LTP program is not designed to run on-line or off-line in the OS/2 or Windows NT environments.
To run the LTP program on-line using Windows 95/98, put the computer into the MS-DOS Mode (MS-DOS 7.x). To do this click the 'Start' button, then click the 'Shut Down' button and click 'Restart the computer in MS-DOS mode'. Do not click on the MS-DOS icon in Windows 95/98 because this will merely go to the DOS Compatibility Box. The MS-DOS Mode in Windows 95/98 is not equivalent to the DOS in the DOS Compatibility Box in Windows 95/98.
Alternatively during the boot-up process on computers using Windows 95/98, just after the 'Starting Windows 95' or 'Starting Windows 98' line comes up and the computer beeps, press F8 to go directly into the Windows 95/98 Startup Menu, then enter 6 for the 'Command prompt only'. This bypasses the need to go into the Windows 95/98 GUI and then down into the MS-DOS Mode. (After finishing the LTP program type C:>\ win to enter the Windows 95/98 GUI. If this is a bit like Windows 3.x and "deja vu all over again", it is. As Andrew Schulman has documented in his "Unauthorized Windows 95" book (IDG Books Worldwide, San Mateo CA, 1994), deep down Windows 95/98 has more DOS than Microsoft would like you to think, but so what.)
To run the LTP program on-line on a computer having both MS-DOS and Windows 3.x, just start the computer in 'Real' Command Line DOS to run the LTP program - don't go into Windows (e.g. do not type C:>win). If you are already in Windows 3.x, exit Windows completely (File->Exit) and return back to 'Real' Command Line DOS to run the LTP program. Don't click on the MS-DOS icon in Windows 3.x because this will merely go to the DOS Compatibility Box. 'Real' Command Line DOS is not equivalent to the DOS in the DOS Compatibility Box in Windows.
2.4.2. On each experimental day, create a directory that contains the date of the experiment. That directory can either be under the C:\LTP113E directory, or under your own data directory. For example, for July 4, 1998 you could use:
| C:\> md \YOURDATA | |||
| C:\> md \YOURDATA\980704 |
(although why any American would be working on this day is beside me).
2.4.3. Move to that directory
C:\> cd \YOURDATA\980704
2.4.4. Start the LTP113E program from within that directory.
| If using the Digidata board: |
| C:\YOURDATA\980704\> ltp113e |
| or if using the Digidata board at a non-default hexadecimal base address: |
| C:\YOURDATA\980704\> ltp113e 100 |
| or if using the Labmaster board: |
| C:\YOURDATA\980704\> ltp113e labmaster |
| or if using the Labmaster board at a non-default hexadecimal base address: |
| C:\YOURDATA\980704\> ltp113e labmaster 100 |
| or if using a Pico ADC-42 board attached to LPT1 and digital output is also through LPT1 (or LPT2 or LPT3): |
| C:\YOURDATA\980704\> ltp113e pico42_dio_1 | |||
| C:\YOURDATA\980704\> ltp113e pico42_dio_2 | |||
| C:\YOURDATA\980704\> ltp113e pico42_dio_3 |
| or if using a Pico ADC-42 board attached to LPT1 and digital output is through LPT2 (or LPT2 and LPT3): |
| C:\YOURDATA\980704\> ltp113e pico42_1__dio_2 | |||
| C:\YOURDATA\980704\> ltp113e pico42_2__dio_3 |
When the LTP program starts up, it automatically determines if the computer is too slow for the chosen data acquisition board, in which case it terminates. However, after this initial 'speedtest' the LTP program does not again check if the computer is fast enough for the data acquisition board. This means that if there was a microprocessor slowdown (which could occur if the microprocessor when into a power saving mode on a laptop computer, or if the 'Turbo' speed was inadvertently turned off), a 100 msec sweep would actually take twice as long (200 msec) in real time. This would mean that a 10 msec duration EPSP would actually appear having a 5 msec duration on the ADsweep graph, and the slope would appear twice as large. If the synaptic potential duration or slope immediately and inexplicably changes by a factor of two, check that the synaptic potential duration is right by independently measuring it with an oscilloscope. Alternatively, if an oscilloscope is not available, restart the LTP program to test the data acquisition board speed again. We have never seen this happen with our Tandon and Dell computers but it is possible that it could happen on your computer (see APPENDIX A.1).
All single AD waveform files (*.P0, *.P1, *.T0 or *.T1), all
averaged AD waveform files (*.AP0, or *.AP1), and all
Amplitude/Calculation files (*.AM0 or *.AM1) will be stored in
this C:\YOURDATA\980704 start-up directory. All initialization
(*.INI) and protocol (*.PRO) files will be stored in the program
directory C:\LTP113E.
It is very important therefore to start the LTP113E program from within the data directory (e.g. C:\YOURDATA\980704) because all the data files will be stored in this start-up directory. In particular, do not start the LTP program from the root directory because the root directory can only save about 500 files before the computer locks up (see APPENDIX A.14). In other words:
| C:\> ltp113e | IS BAD!!! | ||||||
| C:\> ltp113e labmaster | IS BAD!!! | ||||||
| C:\> ltp113e pico42_dio_1 | IS BAD!!! | ||||||
| C:\> ltp113e pico42_1__dio_2 | IS BAD!!! |
2.5 Set the AD Gain, Sample Interval, and Other Parameters
2.5.1 Set the AD Gain, Data Type, and Sample Interval in the Miscellaneous Window
Go to the Miscellaneous Window (shown in Fig. 3.1.6) using PgDn until the last window is reached. Alternatively use the menu commands (see Fig. 3.4.7)
Window -> Miscellaneous values
Change the AD gain to be equal to the total amplification gain from the electrode to the AD board connection. For example, if an Axon Instruments AxoClamp is used in current clamp mode with a x10 output gain, which then goes into a x100 amplifier and then into channel AD0, the AD0 Gain would be 1000. Then set the channel AD0 DataType to "mV".
Alternatively for example, if an Axon Instruments AxoPatch is used in whole cell voltage clamp mode (with a CV-04 1/100 headstage where = 1), with an output gain of = 10, and with the output going channel AD0, the channel AD0 Gain would be the following:
| Vout | Beta * Alpha mV | 1 * 10 * 10-3 | ||||||||||||
| AD0 Gain = | ----- | = | ------------------ | = | -------------- | = | 1010 | = | 10000000000 | |||||
| Iin | pA | 10-12 |
(Yes that's 10 0's!) If the output gain is changed to = 20, the AD0 Gain increases to 20000000000. Then set the channel AD0 DataType to "pA".
Finally, set the PulseSweep ADinterval to 100 usec.
2.5.2 Set the Digital-to-Analog Output
There is no conversion or gain controlling the DA output voltage. The PulseVolt value you enter (in volts; see Fig. 3.1.2) is the output voltage you get (in volts) from the Labmaster or Digidata Digital-to-Analog output channel.
For example, if you are using an Axon Instruments' Axopatch 200B, there is a 50:1 attenuation from the voltage input into the Axopatch 200B, and the output voltage to your voltage-clamped pipette. Therefore you need to set the Rm PulseVolt to:
PulseVolt 0.050v (not PulseVolt 0.001v!)
in the LTP program to output 50mV (not 1mV!) from the Labmaster or Digidata DA, and input that 50mV voltage into the Axopatch 200B to produce a
1 mV voltage-clamp command pulse.
2.5.3 Set the PulseSweep P0 Stimulation Values in the PulseSweep P0 Stimulation Window
Go to the PulseSweep P0 Stimulation Window (shown in Fig. 3.1.2) by pressing PgDn or PgUp until the correct window is reached. Alternatively use the menu commands (see Fig. 3.4.7)
Window -> Pulse P0 stimulation
Set Pulse stimulation values (see also Section 4.4).
2.6 Analog Filtering of the Signal Before Digitization
The waveform signal data should be filtered before being digitized with an analog filter set to half or less of the digitization frequency. For example, if you are acquiring an AD sample at 100 usec intervals (e.g. at 10 KHz sampling frequency), the analog filter should be set to at maximum 5 kHz (1/2 the sampling frequency), or preferably to 2 kHz or lower (except if doing an Rs exponential fit, then keep it at 5 KHz). If the analog filter is set to higher than half the sampling frequency (for example to 10 kHz in the above example), mysterious things can begin to happen due to anti-aliasing such as loosing the capacitative transients (e.g. the Rs measurement) that occur during the voltage clamp pulse when patch clamping.
The analog filter can either be part of the biological amplifier such as the one on the AxoPatch 1D patch-clamp amplifier, or it can be a separate analog filter between the amplifier and the data acquisition board input. Generally, the best analog filters for electrophysiology are Bessel filters because they cause no overshoots, only phase lags.
2.7 Pressing a Function Key to Stimulate and Acquire Data
In the LTP program, protocols are initiated either by pressing a Function Key or by using the menu commands (see Fig. 3.4.6), for example:
Run -> "Pulse stimulation (P0) F5"
or just press Function Key (for example):
F5
For the simplest situation of outputting one stimulus pulse (which can be measured with an oscilloscope) and simultaneously acquiring one sweep of data (an ADsweep), press function key F5.
Examine Train output on an oscilloscope or a chart recorder by pressing CTL-F8.
2.8 Check that the Data Acquisition and Stimulation are Working Correctly
The Data Acquisition / Stimulation functions should be carefully examined by:
1. Input a known (calibrated) signal using voltage and time calibrated stimulator and see if the correct values are plotted on the AD sweep graphs. Be sure to measure waveform acquisition timing by using a TRIANGULAR WAVEFORM input to make sure no delays occur during the data acquisition/ stimulation sweep (see Section 2.2.5). If there is a timing delay, the ramp will not be smooth, but will appear to instantaneously jump to a higher voltage and then continue. This is illustrated in Fig. 2.8.1 where a timing interrupt was made to artificially occur during the sweep (normally this interruption is completely blocked out). Ramps can also be used to test if the slope calculation is working correctly (see section 4.6.3)
Fig. 2.8.1. What a triangular waveform would look like if a ca. 1 msec interruption occurred in the computer during the sweep (not shown).
2. Use a calibrated oscilloscope to measure the voltage and timing of Analog or Digital output pulses that are generated during Pulse and TrainSweeps. This will test for sample-to-sample jitter because both Analog input and Analog/Digital output occur at about the same time because an AD conversion always starts when an Annalog/Digital output occurs. For example, the sample-to-sample jitter can be tested by measuring the width of a train S0 pulse (Fig. 2.8.2).
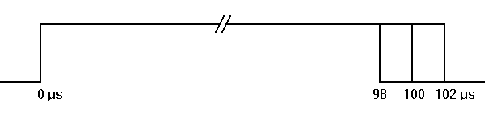
Fig. 2.8.2. 4 usec jitter (+/- 2 usec) on a 100 usec S0 Pulse.
2.9 Choosing the Printer
2.9.1. Hewlett-Packard LaserJet and Compatible Printers
The LTP program presently primarily runs with Hewlett-Packard LaserJet II compatible printers (II, III, 4, 5 and 6) using PCL4 graphics commands. Moderately high resolution (300 dots/inch) plots of ADsweep and Amplitude/Slope graphs are output to the LaserJet printer.
To choose the printer, use the menu commands (see Fig. 3.4.5.A):
Options -> Printer/plotter
and then from the upper group of the dialog box choose either 'None' or 'HP LaserJet II, III, 4, 5, 6' (Fig. 2.9.1).
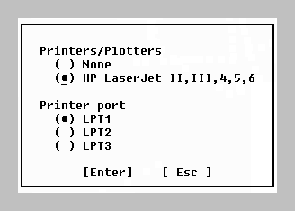
Fig. 2.9.1. Printer and Printer Port Dialog Box.
If you are using a printer, connect the parallel printer port on the printer to parallel printer port LPT1, LPT2 or LPT3 on the computer, then from the lower group of the dialog box choose either 'LPT1', 'LPT2' or 'LPT3'. If you are already using a Pico board with digital output on LTP1 or LTP2, make sure this does not conflict with printer usage.
These values determining hardware specifications are automatically saved in the hardware.ini initialization file every time a new value is entered.
2.9.2. Hewlett-Packard DeskJet and Compatible Printers
The LTP program does not specifically support the popular Hewlett-Packard DeskJet and similar inkjet printers, but we have found through trial and error that the LTP program can plot ADsweep and Amplitude/Slope graphs to the Hewlett-Packard DeskJet 870cxi, and may well do so for other deskjet/inkjet printers. Just choose 'HP LaserJet II, III, 4, 5, 6' from the upper group of the Printers dialog box (see Fig. 2.9.1). You just have to try your DeskJet/inkjet printer to find out if this will work.
Although plotting the Amplitude/Slope calculation graphs worked fine, we did notice that only one ADsweep graph could be plotted per page (say out of four). This problem has not been corrected.
2.9.3. Other Printers/Plotters
The LTP113E program does not support Epson FX80 compatible printers, Postscript language printers or Hewlett-Packard 7475 compatible plotters, and will probably not do so in the future.
2.10 Printing an AD Waveform Graph to the Printer
If the computer is connected to a Hewlett Packard LaserJet II, III, 4, 5, 6, or compatible printer, print an AD waveform to the printer by pressing ALT-P and ALT-P again to elicit the following menu commands (Fig. 3.4.3A):
PulseFile -> Plot graph to printer/plotter
Then press Alt-P, Alt-E and Alt-P to eject the printer page if less than four plots have been graphed:
PulseFile -> Eject plot page -> Eject printer/plotter page
If the program has performed the above tasks, it is ready to be set-up in more detail for your particular experiment (Chapter 4).